りすさんのしまりすコーポレーション Squirrel's chipmunk Corporation > Risu’s Blender 2.83 Tutorial
Risu’s Blender 2.83 Tutorial
このページはりすさんがBlender 2.83の設定を忘れないためのチュートリアルページです
Blender2.83のeeveeで実行可能なサンプルデータを置いてます
This page is a tutorial page for “chipmunk” to remember to set Blender 2.83.
I put sample data that can be executed by Blender 2.83 eevee.
Blenderのeeveeでガラスっぽい表現
Blender2.83 eevee with glassy expression
マテリアルのシェーディング参照
Material shading reference

注意点
HDRIを使わないと、ガラスに見えない
サンプルでは二つの球体をガラス化しているが、それぞれ設定方法は異なるため写り方に差異がある
important point
If you don’t use HDRI, it won’t look like glass
In the sample, two spheres are made into glass, but the setting method is different for each, so there is a difference in the way they appear.
オブジェクトを映す鏡のオブジェクト
Mirror object that reflects objects
反射鏡面と反射板の2つのオブジェクトが必要になる
You need two objects, a specular surface and a reflector
png画像の透過部分を表現する
Represent the transparent part of png image
背景が透過処理されているpng画像を表示する
Display a png image with transparent background

設定はマテリアルのシェーディング参照
See Material Shading for settings

発光体を作る
Make a luminous body
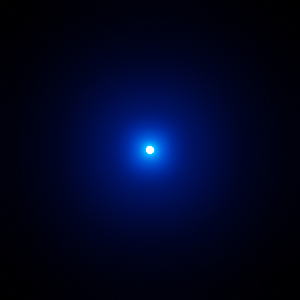
シェーダーでemissionを導入するだけである。ファイルのシェーダー参照
※Render propertyのBloomにチェックを入れる必要があります
爆発エフェクトを作る
Make an explosion effect
クイックエフェクトで爆発を選択するだけ
タイミングの設定はperticle propertyで行う
発光は上記の「発光体をつくる」と同様
花火を作る
Make Fireworks
クイックエフェクトの爆発などを試したが、一番しっくりきたのは単純にシェイプキーでの表現だった
I tried exploding quick effects, but the thing that worked best was simply the shape key expression.
シェイプキーの表現では任意の形に花火を作成可能
マテリアルの色を変化させれば、花火の色の変更が可能
花火をキラキラさせる場合、オブジェクトに光を当て反射させるなどなんらかの工夫が必要
サンプルでは、花火の玉の形をいびつにすることで、反射してキラキラしやすいようにしている
Shape key expression allows you to create fireworks in any shape
The color of the fireworks can be changed by changing the color of the material
When sparkling fireworks, some kind of ingenuity is required, such as shining light on the object and reflecting it
In the sample, the shape of the fireworks ball is distorted to make it easy to reflect and glitter.
炎と煙のシュミレーション
Flame and smoke simulation
球体などを作成し、オブジェクトからクイックエフェクト→煙を選ぶと作成できる。
この時、球体を囲むように立方体が出現する。この立方体の範囲内で炎はシュミレーションされる。
基本的な設定は立方体側で行われる。(炎が出る球体ではない)
初期設定ではレンダリングモードでは赤い炎は白い煙のように表現されるので、shadingの項目からprincipled volume の blackbody intensityを1にすると炎が赤く表現される。
It can be created by creating a sphere and selecting Quick Effects → Smoke from the object.
At this time, a cube appears around the sphere. Within this cube the flame is simulated.
Basic settings are made on the cube side. (It is not a sphere with flames)
By default, the red flame is rendered like white smoke in the rendering mode, so if you set the black body intensity of the principal volume to 1 in the shading item, the flame will be rendered red.

2.83では設定項目からbakeの項目が消滅しているが、physics propertyのキャッシュのタイプがデフォルトではリプレイになっているのが原因である。これをモジュラーかファイナルにするとbekeの項目が一応出現する。
一応というのは、ここをいじると炎はなぜか出なくなる。不具合なのか、他に設定が必要なのかは不明。
In 2.83, the item of bake disappears from the setting items, but this is because the cache type of physics property is replay by default. If this is modular or final, the item of beke appears for the time being.
For the time being, if you play around here, the flame will not come out for some reason. It is unknown whether it is a malfunction or whether other settings are required.
デフォルトのリプレイだと、勝手にベイクのファイルが作られているようなので、いじらないほうがいいかもしれない。なおリプレイでも気まぐれでシュミレーションしてくれなくなることがある。
初期設定では、炎と煙はろうそくの火のような感じであるが、「physics property」のノイズにチェックを入れると多少それっぽい炎になる。
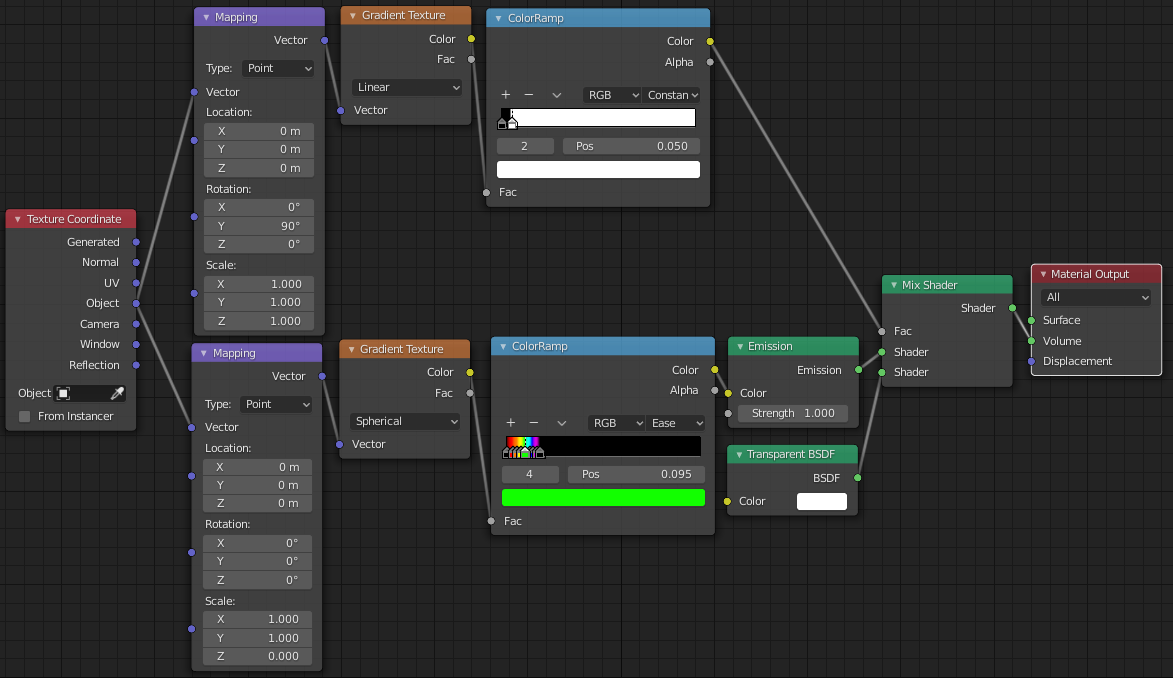
炎の色を変更する際は、シェーディングで属性、カラーランプ、発光、数式が必要になる。つなぎ方はサンプル参照。
With the default replay, it seems that a bake file is created arbitrarily, so it may be better not to mess with it. Even in a replay, it may be capricious and you may not be able to simulate it.
In the default setting, flame and smoke are like a candle fire, but if you check the noise of “physics property”, it will be somewhat like that.
When changing the color of flame, shading requires attributes, color ramp, light emission, and mathematical formula. See the sample for how to connect.
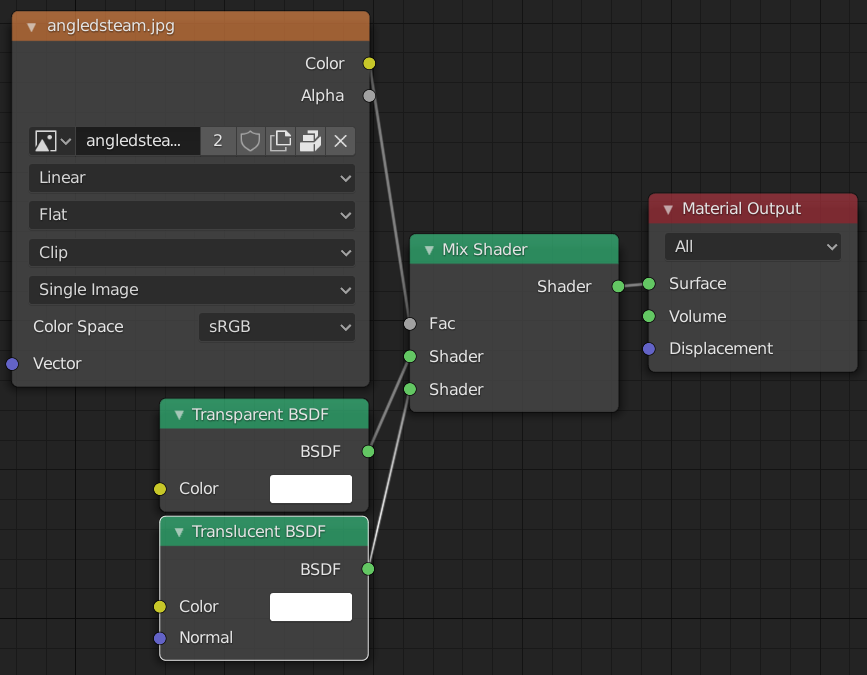
jpg画像を透過させる
Make jpg image transparent
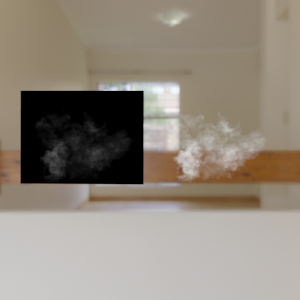
サンプルは背景が黒で、白煙が描かれている画像を使用している
設定はサンプルのシェーディング参照
The sample uses an image with a black background and white smoke
See sample shading for settings
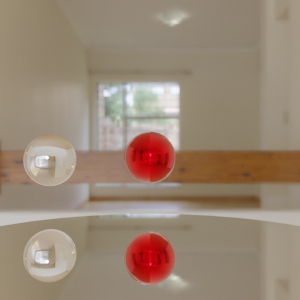
水面の表現
Representing the water surface
この水面は動くものではない。
動かしたい場合はモディファイアの「ocean」を使うほうがいいかもしれない。
シェーディングのglossy BSDFで色を、bumpのstrengthで水面の凹凸を調整できる。
水面の反射はrender propertyのscreen space reflectionsにチェックが必要になる。
This surface of water does not move.
It may be better to use the modifier “ocean” if you want to move it.
You can adjust the color with the glossy BSDF of shading and the unevenness of the water surface with the strength of the bump.
For the reflection on the water surface, you need to check the screen space reflections of the render property.

スモークの表現
Smoke expression
下準備
球体を作り、球体を動かすための「Bezier Curve」を配置する。
「bezier curve」を適当な形にし、
球体の「object constraint properties」から「follow path」を追加して、ターゲットを「bezier curve」にすることで、球体が「bezier curve」に沿って動くようになる。
Preparation
Create a sphere and place a “Bezier Curve” to move the sphere.
Make “bezier curve” an appropriate shape,
By adding “follow path” from “object constraint properties” of the sphere and setting the target to “bezier curve”, the sphere will move along the “bezier curve”.
煙を発生させる
球体を選択し、「クイックエフェクト」から煙を選ぶと、とりあえず煙は発生するようになる。
「smoke domain」を全体が収まる程度に拡大調整する。
「smoke domain」の設定項目は「physics property」で行うが、
設定項目は2点
「resolution division」→数字を増やすと煙が鮮明になる?
数字を増やすと格段に処理が重くなるので注意。サンプルデータは128だが、設定中は32程度に減らしたほうがいいかも
「dissolve」にチェックし、timeを20にする→煙の出方が変わる?
煙にムラを作る場合は新規に球体を選択後、新規にテクスチャーを作り、typeを雲にし、コントラストを5程度にしておく。
「physics property」のテクスチャーの項目をチェック、新規で作成したテクスチャーを選択しておく。
Generate smoke
If you select a sphere and select smoke from the “quick effect”, smoke will be generated for the time being.
▽ Expand and adjust the “smoke domain” to the extent that the whole fits.
The setting item of “smoke domain” is done by “physics property”,
2 setting items
“Resolution division” → Will smoke become clearer if the number is increased?
Note that increasing the number will significantly increase the processing load. Although the sample data is 128, it may be better to reduce it to about 32 during setting
Check “dissolve” and set time to 20 → Will the way smoke come out?
If you want to create uneven smoke, select a new sphere, create a new texture, set type to cloud, and set the contrast to about 5.
Check the texture item of “physics property” and select the newly created texture.
煙に色を付ける
サンプルデータのシェーディングを参照
Color the smoke
Refer to sample data shading
アニメーションで同じ動作をループさせる
Loop the same action with animation
この動画は全120フレームで構成されるが、左のランタンは左に一回、右に一回揺れるようにしてある。
右のランタンは360度一周だけ回るようにしてある。
アニメーションのモードで左のランタンを選択し、トランスフォームの上で右クリックする。extrpolation modeからmake cyclicを選ぶと左のランタンのように左右に振れ続ける。
右のランタンを選択し、extrpolation modeからlinear extrpolationを選ぶと、ランタンが止まることなく回り続ける。
This movie consists of 120 frames, but the lantern on the left swings once to the left and once to the right.
The lantern on the right is designed to rotate around 360 degrees.
Select the lantern on the left in the animation mode and right-click on the transform. If you select make cyclic from extrpolation mode, it keeps swinging left and right like a lantern on the left.
Selecting the lantern on the right and selecting linear extrpolation from the extrpolation mode will keep the lantern spinning without stopping.

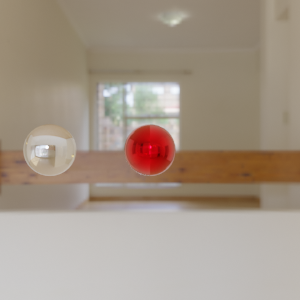
カメラで被写界深度(ピント調節)をする
Adjust the depth of field (focus adjustment) with the camera

手前の球体にピントはあっているが、奥の球体はピントがずれている
球体には何の設定も必要ない。カメラでどこにピントを合わせるかを指定するが、
サンプルではemptyのplain axesを作成し、これにピントを合わせている。(以後focusと呼ぶ)
focus作成後、カメラのobject data propertyのdepth of fieldをチェックしfocus objectの項目をfocusにする
Compositingに切り替え、use nodesにチェックを入れる。
The sphere in the foreground is in focus, but the sphere in the back is out of focus.
Sphere does not need any settings. Specify where to focus with the camera,
In the sample, we created an empty plain axis and focused on it. (Hereafter called focus)
After creating focus, check depth of field of object data property of camera and set focus object item to focus
Switch to compositing and check use nodes.
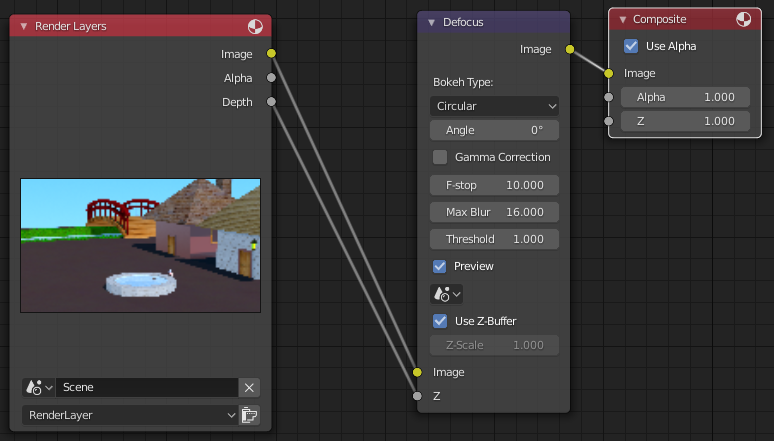
render layersとcompositeの間にdefocusをいれ、それぞれ接続する。接続方法はサンプルと画像参照
defocusのF-stop等の値を調整することで、ピンボケ具合を調整できる
Put defocus between render layers and composite and connect them respectively. See sample and image for connection method
By adjusting the defocus F-stop and other values, you can adjust the out-of-focus condition
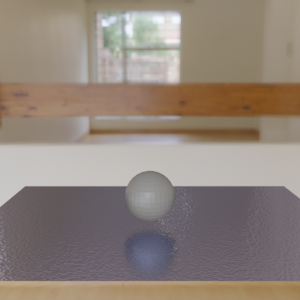
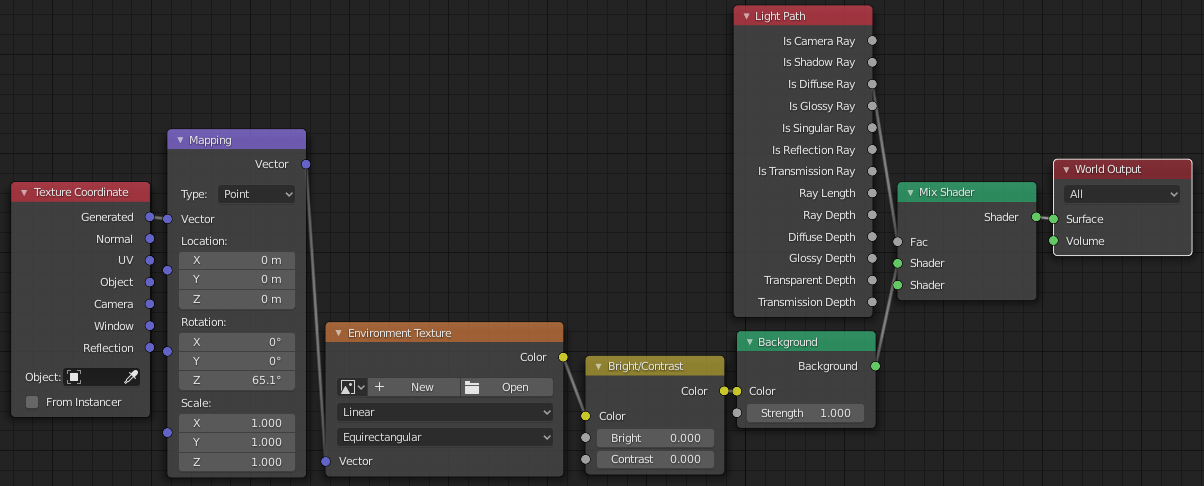
簡易的な青空を作る
Create a simple blue sky
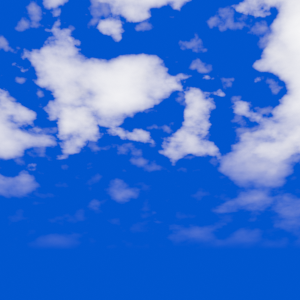
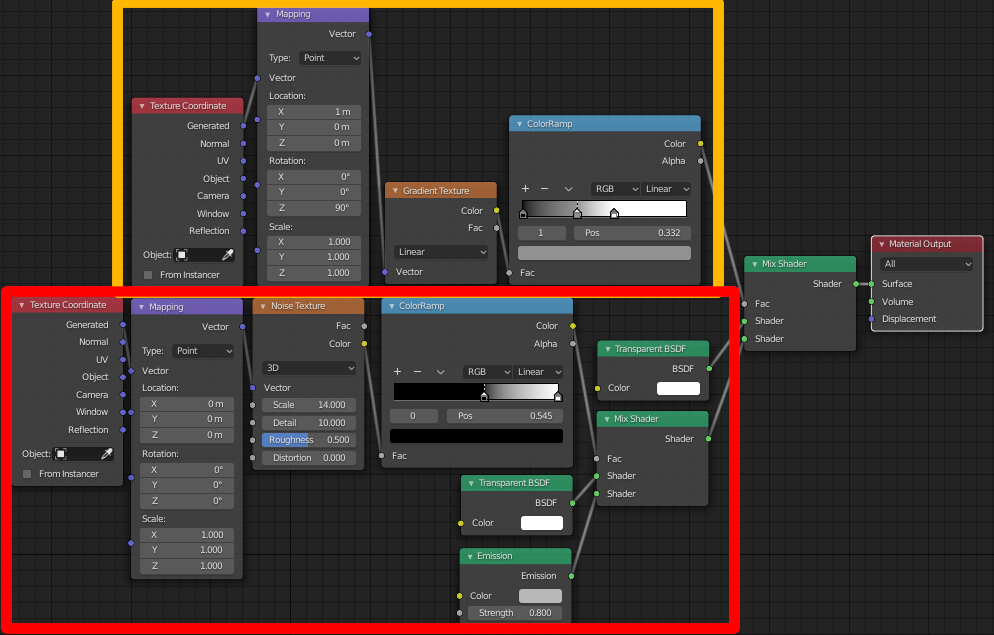
planeをつくり、シェーディングの設定で雲を表現する
雲自体の作成は、赤ラインで囲まれた部分で行う
奥行きで雲を薄くする部分は、黄色線で囲まれた部分で行う
(奥行きを薄くしない場合は黄色枠の部分は不要)
Create a plane and express the cloud with shading settings
The cloud itself is created in the part surrounded by the red line.
The part that makes the cloud thinner in the depth is done in the part surrounded by the yellow line
(The yellow frame is not necessary if the depth is not made thin)
虹を作る
Make a rainbow
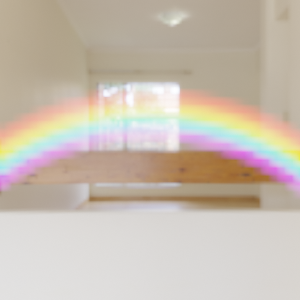
planeオブジェクトに虹の部分と透過する部分を作成する
shadingの設定は画像を参照
Create a rainbow part and a transparent part in the plane object.
See image for shading settings.
Blender2.83のeeveeで水のシュミレーション
Simulation of water with eevee of Blender 2.83
※このファイルはベイクされていないので、シュミレーション開始前にベイクすること
* This file is not baked, so bake it before starting the simulation.
立方体1(water1)を作り、物理演算プロパティーの流体を選択、タイプをドメイン、ドメインタイプを液体にする。
(シュミレーションの範囲はドメイン指定された立方体の中で行われる)
項目内の下部にあるメッシュにチェックを入れる。
(メッシュにチェックを入れないと、ドメイン指定した立方体が変化しない)
もう一個立方体2(water2)を作り、立方体1の中で、1よりも小さくして配置する。物理演算プロパティーの流体を選択、タイプをフロー、フロータイプを液体にする。
(フロー設定された立方体2が液体になる)
立方体1(water1)の物理演算プロパティーの最下部のキャッシュを最終結果にする。すべてベイクをクリックするとシュミレーションが開始される
Create a cube 1 (water1), select a fluid in the physics properties, set the type to domain and the domain type to liquid.
(The scope of the simulation is done in a domain-specified cube)
Check the mesh at the bottom of the item.
(If you do not check the mesh, the cube specified by the domain will not change)
Make another cube 2 (water2) and place it in the cube 1 smaller than 1. Select the fluid in the physics properties, set the type to flow, and set the flow type to liquid.
(The flow-set cube 2 becomes liquid)
Make the cache at the bottom of the physics properties of cube 1 (water1) the final result. Click All Bake to start the simulation
Blender2.83でテキストにパーティクル設定
Particle settings for text in Blender 2.83
ブルームにチェックを入れること
パーティクルの設定はファイル参照
テキストはSHIFT+Aでテキストを選択
テキストは編集画面にて、文字を変更することができる
Check Bloom
See file for particle settings
Select the text with SHIFT + A
You can change the characters of the text on the edit screen.
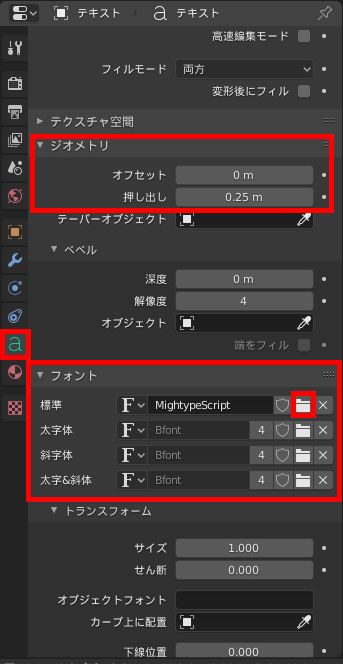
文字のフォントはオブジェクトデータプロパティーの中の「フォント」で行う
(最初は「Bfont」になっています。右側のフォルダマークを選択すると任意のフォントを選べます)
フォントの形はblender上では確認しにくいが、C:windowsのfontフォルダにあるので、直接見たほうがわかりやすい
このサンプルでは「Meight type script」というものを選んでいます
文字の厚みは、「ジオメトリ」の「押し出し」で、設定可能
この状態では、パーティクルの設定などはできないため、文字の編集を終えたら文字をクリック「メッシュに変換」をクリックすると文字のデータがメッシュ化され通常の編集ができるようになります。(文字の変更などはこの時点でできなくなる)
Character font is done in “Font” in the object data property
(At first, it is “Bfont”. You can select any font by selecting the folder mark on the right side.)
The shape of the font is difficult to check on blender, but it is easier to understand because it is in the font folder of C: windows.
In this sample, we chose “Meight type script”
Character thickness can be set by “Extruding” of “Geometry”
In this state, particles cannot be set, so when you finish editing the character, click the character. Click “Convert to Mesh” to mesh the character data and enable normal editing. (Characters cannot be changed at this point)